


Chef Zachary Engel was eight years old the first time he went to Israel. He remembers the trip vividly; he first ate salatim—a huge spread of small dishes served with bread or pita—at the house of his parents’ friends.
It was the first time he had eaten anything like that. Twelve years later, when he got off a plane in Tel Aviv to cook at Catit, he stumbled across the street into a restaurant and ordered a slew of dishes that turned out to be salatim. “It was wild, because I was there by myself and didn’t realize how much food I was ordering,” Engel laughs, remembering the meal. I guess the kitchen assumed I had other people coming, but it was just me.” He describes how much he enjoyed the experience, eating his way through dishes. He says, “Salatim is a choose-your-own-adventure course.”
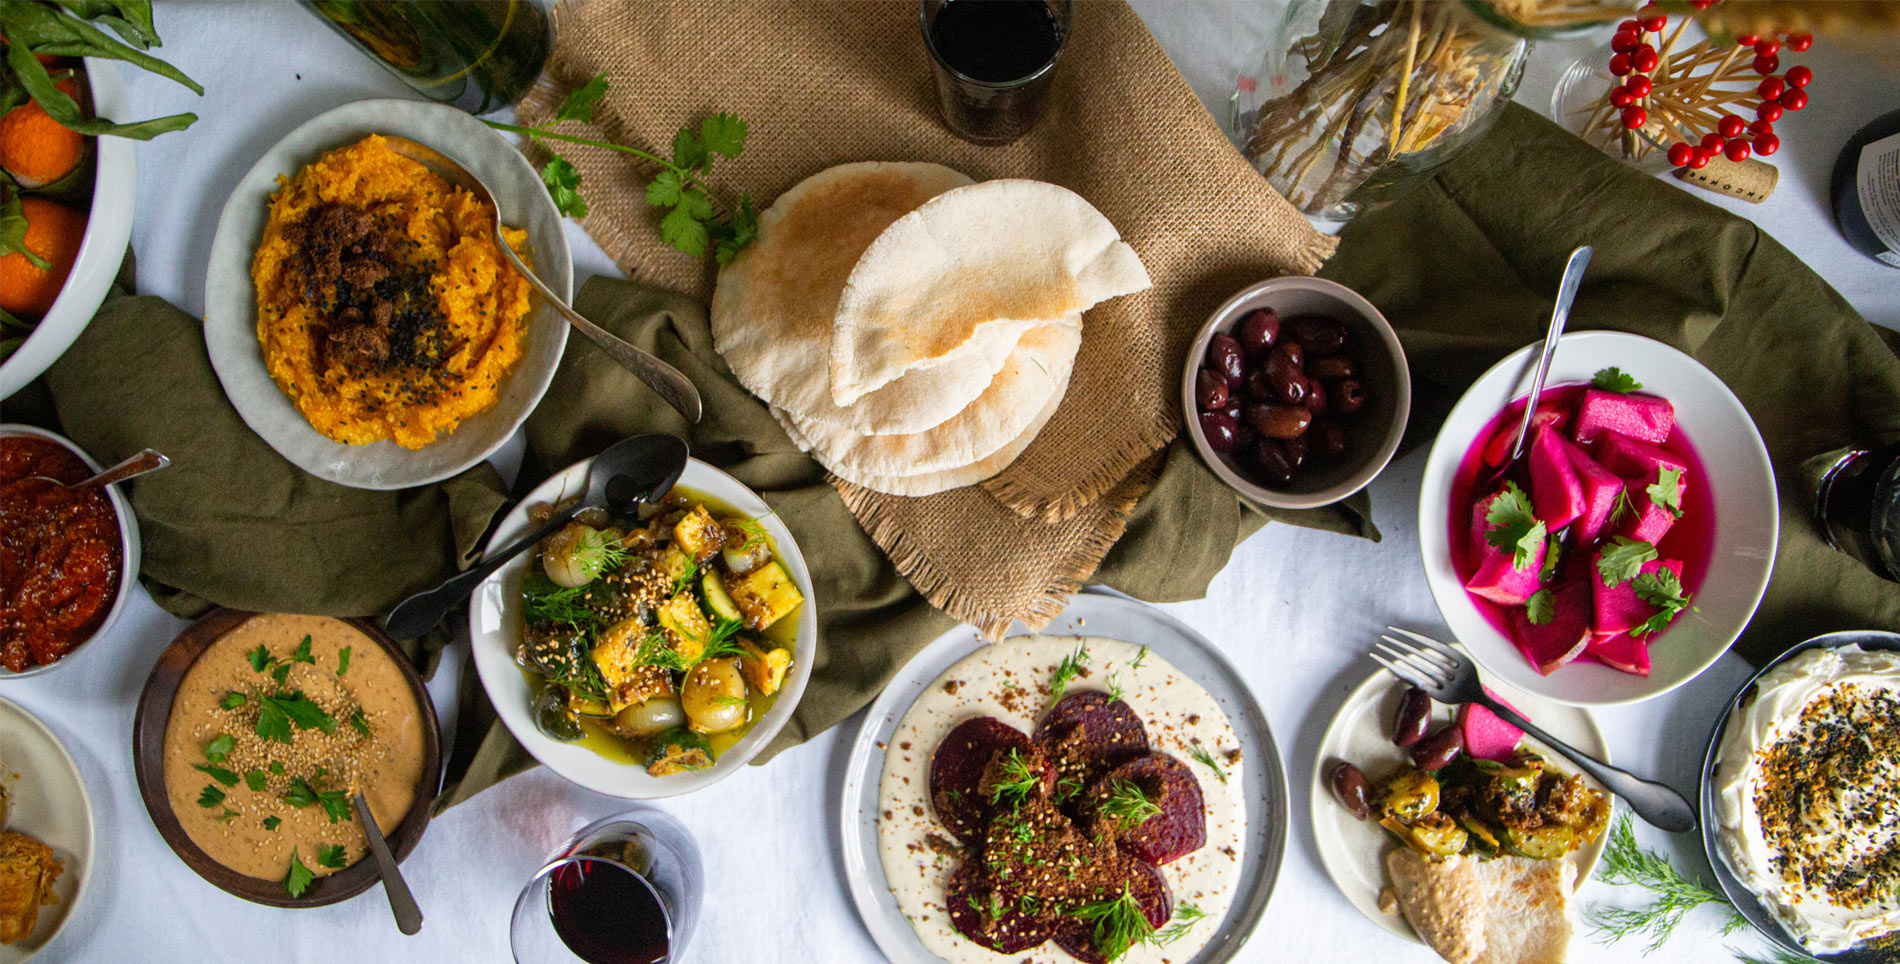
Salatim is just one highlight of the menu at Engel’s Galit in Chicago. Opened last year in a roomy but inconspicuous spot in Lincoln Park, Galit immediately began making waves in the local food scene. Accolades rolled in from Food & Wine, The Infatuation, and the Chicago Tribune, recognizing Galit as a fresh new favorite, wrangling the complicated cuisine of the Middle East into a menu that is as delicious as it is approachable. A look around the restaurant confirms what Engel knew from an early age: salatim is a people pleaser.
As Middle Eastern cuisine skyrockets in popularity, salatim has made for an exciting menu addition to many a dinner party outside the restaurant as well. While few home cooks would dare hope to present a spread akin to the one produced by a James Beard Award-winning chef, Engel assures me it is less intimidating than one would expect.


“If you’re having a dinner party and you find it challenging to get a ton of dishes on the table at the same time, salatim is a great play,” Engel says. He suggests that many of the dishes benefit from being prepared in advance, which makes it a simple spread to serve at room temperature eliminating the complicated task of timing out courses.
He tells me there are five essential items for a proper salatim spread: “Pickles, something spreadable, hummus, labneh, and something seasonal that’s been dressed up with spices and herbs.” But a host can be creative as well. “Pickles can be anything,” Engel says. “Try a different vegetable and pickle it anyway you like. As long as it has some spice and provides a nice, bright crunch, it’ll do the trick.”
The “something spreadable” can be anything from baba ganoush to tershi, a roasted squash jazzed up with olive oil, vinegar, and spices currently on the menu at Galit. The notion is that something is available to spread on top of the non-negotiable pita, lavash or sourdough bread that come standard with the salatim.
Hummus and labneh—a thickened yogurt made by straining out liquid—may be more commonly known and available for purchase, but Engel takes the time to plug the benefits of making both from scratch, as they do at Galit. He advises, however, that dressing up store-bought versions by whipping them in a food processor with olive oil and fresh herbs will also enhance the experience.
The open-ended “something seasonal” is the most exciting dish to conjure. Engel advises beginning with a seasonal vegetable prepared simply, then raiding the Middle Eastern pantry to find spices, oils and flavors to fortify. This time of year, he loves to roast a root vegetable in a high-heat oven until caramelized, then top it with spices and a hit of an acidic element, a technique evidenced in Galit’s roasted beet and tahini salad.
While he advocates for experimentation, he cautions: “Don’t go crazy. [Salatim] is one of those things that gets easier when you do it a couple of times, especially if you’re able to buy some of the elements to make it easier.” According to Engel’s instructions, it sounds like a spread that’s hard to get wrong, even if you overestimate the amount of food. “Salatim gets even better when it’s leftover.” As the opener, salatim sets the ambiance for a party. He tells me, “It immediately says, ‘This dinner is going to be fun, communal, and we’re going to enjoy each other’s company.’”
Recipe
Beets with Black Garlic Tehina, Pumpernickel and Dill
Ingredients:
- 1 lb. red beets
- 1 lb. chioggia or candy cane beets
- 4 slices pumpernickel rye bread
- ¼ + ⅛ cup extra virgin olive oil
- 2 tablespoons Morton’s Kosher Salt
- 1 teaspoon caraway seed, ground
- 1 teaspoon dill seed, ground
- ½ cup lemon juice
- 3 cloves garlic
- 4 cloves black garlic
- 1 teaspoon Morton’s Kosher Salt
- 1 ½ cups raw tahini, (preferably Soom brand)
- 1 ½ cups ice cold water
- 3 sprigs of dill
This recipes is based off of a traditional salatim seen all over Israel with some bold flavors. It’s great for large parties and easy to make some of the components (or all of them) a day or two beforehand for less time in the kitchen while hosting.
Method for the roasted beets:
- Preheat the oven to 375℉. Make sure all the tops are removed from the beets and wash them under cold water to remove any dirt, but don’t peel them. Toss beets in 1 tablespoon of salt and ¼ cup of extra virgin olive oil in a large mixing bowl.
- Place the beets in a single layer in a large baking dish. Add any excess water from the bowl to the pan. If you don’t have excess water, then add a ⅛ cup to the bottom of the pan. Wrap the edges of the pan tightly in foil.
- Bake the beets for about 1 hour. To check them, gently lift the edge of the foil and place a small knife inside. If the knife slides in very easily, they are done. Remove them from the oven and let them cool for about 15 minutes. (If they’re not fully cooked put the foil back around the edge of the pan and check them every 15 minutes).
- Once the beets are cooled but still warm, remove the foil. With a dry dish towel in your hands, gently rub off the skins of the beets and place in a large bowl. Gently rinse any excess skin off in cold water.
- Cut the beets into ½-inch slices or cubes and set aside or refrigerate if using later.
Method for pumpernickel crumble:
- Change the temperature on the oven to 225°F.
- On a baking sheet, lay down the slices of pumpernickel rye bread. Drizzle the ⅛ cup of extra virgin olive oil on the slices and sprinkle with 1 tablespoon of salt and the caraway and dill seeds.
- Bake in the oven for 45 minutes until very crispy. Remove and cool fully.
- Break the dry pieces into chunks and place in a food processor with a blade. Pulse at 3-second intervals for about 2 minutes until it becomes a medium crumble.
Method for the black garlic tehina:
- Crush the garlic cloves on a cutting board with the side of a large knife and add to the lemon juice. Let sit for 30 minutes.
- Remove the garlic cloves and any peels from the lemon juice. Place the lemon juice in a blender with the black garlic cloves and 1 teaspoon of salt. Puree on high for 2 to 3 minutes until smooth.
- In a stand mixer with a whip attachment, whip the raw tahini for about 5 minutes on high speed.
- Decrease the speed to medium and slowly drizzle in the black garlic-lemon juice. The tehina will get very grainy and tight in texture but will get smooth immediately after.
- Slowly add the ice cold water with a steady stream. Once all the water is incorporated, turn the speed on high for 5 minutes. You’ll see the tehina become smooth and glossy and become very airy like an aioli or a mousse. (Note: It’s best to add most of the water but not all of it. You can always add more if you would like it thinner).
To assemble:
- Pick the dill from the whole sprigs and chop very lightly.
- Place the tehina on the bottom of the plate in a large circle. Toss the beet pieces in a little olive oil and salt; spread on top of the tehina. Sprinkle the pumpernickel crumb with a heavy hand and then follow with the chopped dill.
Recipe
Ala Grecque: Onions & Zucchini
Yields: 8 portions
Ingredients:
- ½ lb. cipollini onions, peeled
- 1 lb. zucchini or yellow summer squash
- 1 teaspoon salt (for seasoning the squash)
- 1 yellow onion, sliced thinly
- 4 cloves garlic, sliced thinly
- 1 ½ tablespoon black peppercorns, whole
- 1 ½ tablespoon coriander seeds, whole
- 3 cloves
- 1 tablespoon yellow mustard seeds
- 1 tablespoon aleppo pepper
- 5 sprigs of thyme
- ½ teaspoon sugar
- 4 cups extra virgin olive oil
- 4 cups white wine vinegar
- 3 tablespoons salt
For garnish:
- 1 cup bulgarian feta
- 1 tablespoon aleppo
- 1 bunch parsley, chopped finely
Method:
- Cut the stems and ends off of the zucchini and slice in half lengthwise. Sprinkle the cut sides with 1 teaspoon of kosher salt. In a 12” sautee pan over medium heat add a little bit of oil to the pan and cook the zucchini with the cut sides down to get a little caramelization on them. Remove the zucchini from the heat.
- Put a ¼ cup of oil into a 4-quart sauce pan or stock pot over medium heat. Add the sliced onions and garlic until they are cooked fully, opaque and almost caramelized.
- Add all of the spices to the onions: peppercorns, coriander seeds, cloves, yellow mustard seeds and aleppo pepper. Stir frequently for 2 to 3 minutes until the spices are toasted and the pot has a strong aroma. Add in the sprigs of thyme and saute for 30 seconds.
- Add in the remaining olive oil, white wine vinegar, salt and sugar; mix thoroughly. Bring the pot to a low simmer.
- Add the cipollini onions to the pot and cook on low heat, with a lid (or wrap the top of the pot with aluminum foil) for 30 to 45 minutes until the cipollini onions are caramelized and tender.
- With a long-slotted spoon, remove the cipollini onions from the pot and let them cool.
- Cut the charred zucchini into 1 ½ inch segments and place gently into the pot. Cook for 15 to 20 minutes on a low simmer until tender. Turn off the heat. Add the cipollini onions back to the pot and let cool to room temperature.
- Serve them now or keep them in the refrigerator for up to 4 weeks. If you want to use the vinaigrette (oil and vinegar) simply remove the vegetables, put the liquid back on the stove, and heat until just warm. Strain all the spices and onions out by pouring the liquid through a fine mesh sieve. Before serving, make sure to whisk thoroughly so the oil and vinegar are appropriately mixed.


Our comments section is for members only.
Join today to gain exclusive access.